If you’re running Google Ads but not tracking conversions properly, you’re essentially flying blind. You might be getting clicks and impressions, but without knowing what happens after someone clicks your ad – whether they make a purchase, fill out a form, or call your business – you can’t truly measure success or optimize for better performance.
That’s where conversion tracking comes in.
In this guide, we’ll walk you through how to set up conversion tracking in Google Ads the right way – step by step. Whether you’re just starting out or looking to improve your current setup with features like Enhanced Conversions or offline tracking
Jump ahead to:
What is Conversion Tracking in Google ads
Conversion tracking in Google Ads allows you to measure the actions users take after interacting with your ads, whether it’s a purchase, form submission, phone call, or app install. With the rise of performance-driven marketing and automated bidding strategies, having accurate conversion tracking in place is more important than ever.
By tracking these actions, you can evaluate campaign performance, optimize your bidding strategies, and improve your return on ad spend (ROAS).
Why should you use conversion tracking?
Conversion tracking informs Google Ads which actions – like form submissions or purchases – are most valuable to your business.” This helps you pinpoint exactly where your advertising budget is being spent and uncover opportunities to enhance performance
Additionally, conversion data gives you a clearer picture of which elements of your Google Ads campaigns are truly working. For example, imagine a campaign with several different ads. Even if your overall conversion rate looks good, conversion tracking lets you drill down to see which specific ads are delivering results.
With Google Ads conversion tracking, you can determine:
- Which ads are generating the highest number of website conversions
- The top-performing keywords and placements
- Campaigns that receive many clicks but fail to convert
Moreover, the insights gathered from conversion tracking aren’t just useful for paid search. You can leverage them in your remarketing efforts, targeting users who’ve already shown interest – helping boost ROI by re-engaging past visitors
How to Set Up Google Ads Conversion Tracking Properly
We’ll walk you through the step-by-step process to set up Google Ads conversion tracking using the Google Tag.
What Is a Google Tag?
The Google Tag is a small piece of JavaScript code that you install on your website. It helps send conversion data back to Google Ads when users complete a desired action on your site (like submitting a form or making a purchase). This code acts as a trigger that tells Google, “A conversion just happened.”
Step-by-Step Guide to Set Up Google Ads Conversion Tracking
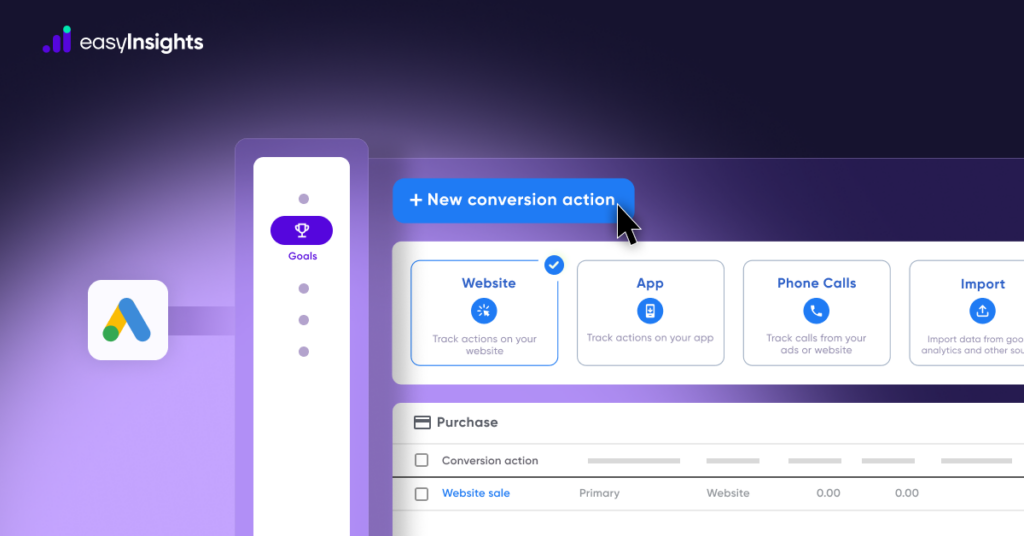
Step1: Create a conversion action
1. Sign In to Google Ads
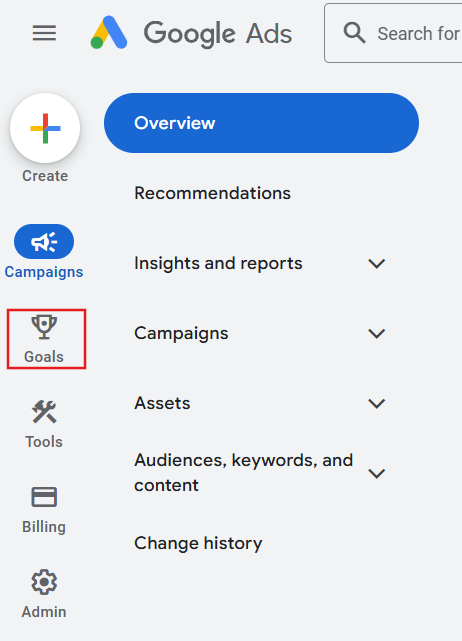
2. Navigate to the Conversions Section
- Click the Goals on the left-hand side menu.
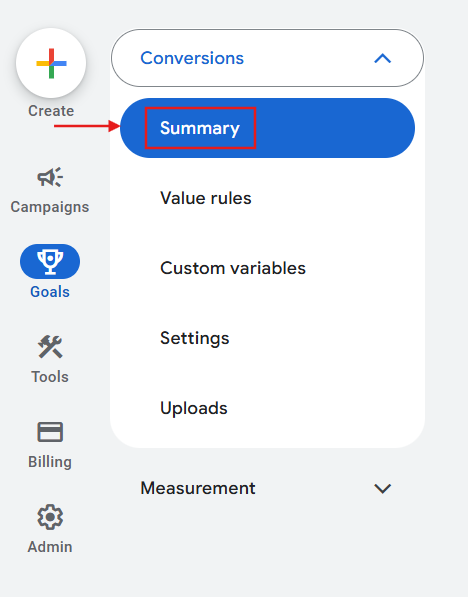
3. Under “Conversions,” click on Summary.
4. Hit the blue + New conversion action button.
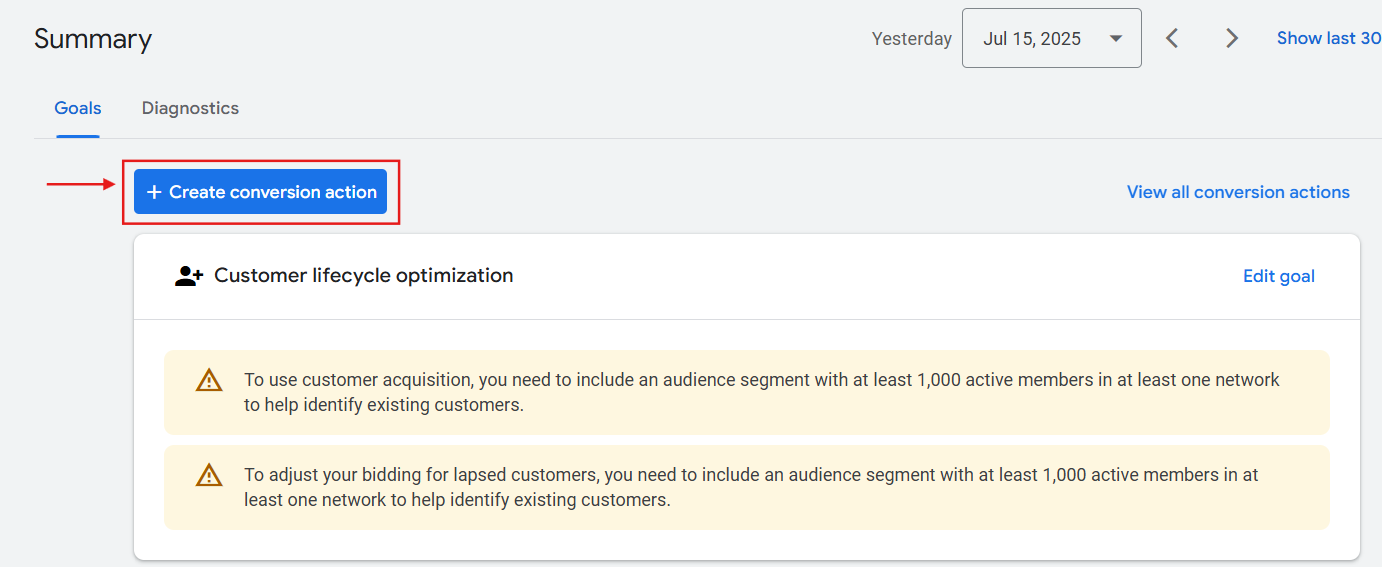
Tip: If you’ve never created a conversion before, this section might be empty, and Google will guide you through the first setup.
5. Choose the Conversion Source
You’ll now see four options for where your conversion comes from:
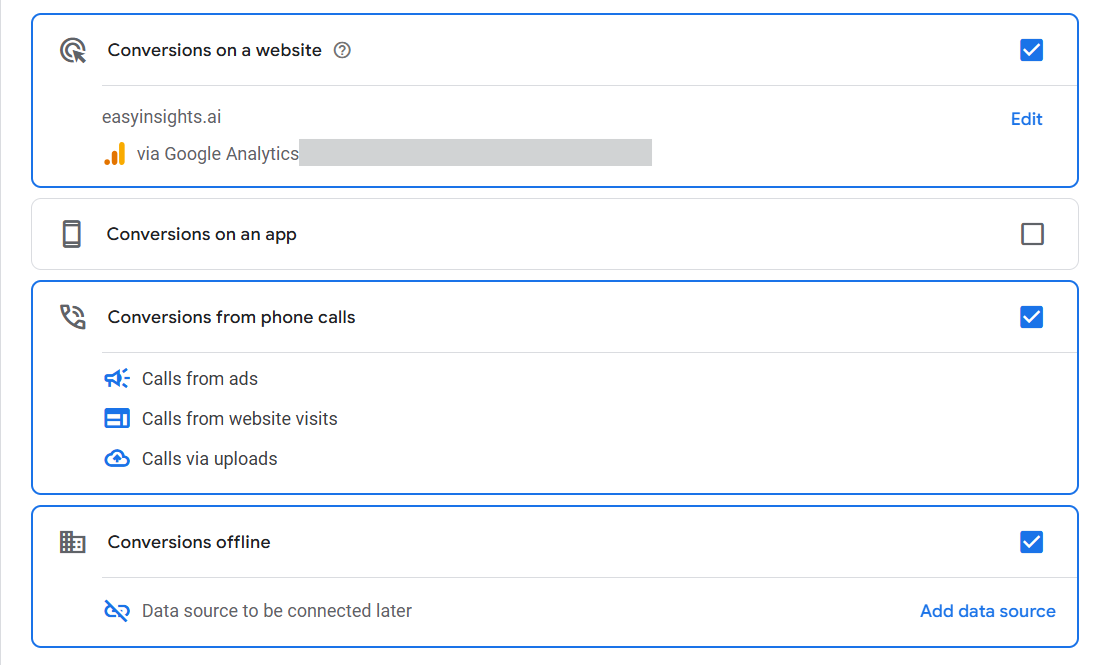
- Website: for actions like purchases, form fills, or signups.
- App: if you want to track in-app actions from iOS or Android.
- Phone calls: to track calls from your ads or website.
- Import: to import conversions from Google Analytics, a CRM (like Salesforce), or offline sales.
You can create conversion actions in Google Ads in two ways: by using existing Web and App events from Google Analytics or by setting them up manually.If you go with the Google Analytics option, there’s no need to touch your website’s code – the setup is quick and easy.
However, if you choose to set up the conversion manually, you’ll need to add a special event code (called a snippet) to your website to track the action.
Step 2: Installing the Google tag
Setting up the Google tag involves three key steps:
- Install the Google tag
- Manually adding event snippets for conversion tracking
- Verifying the Google tag by using Google Tag Assistant
Install the Google tag.
In the Google ads interface click on tools, then Data manager. Then you will see an option of Google tag.
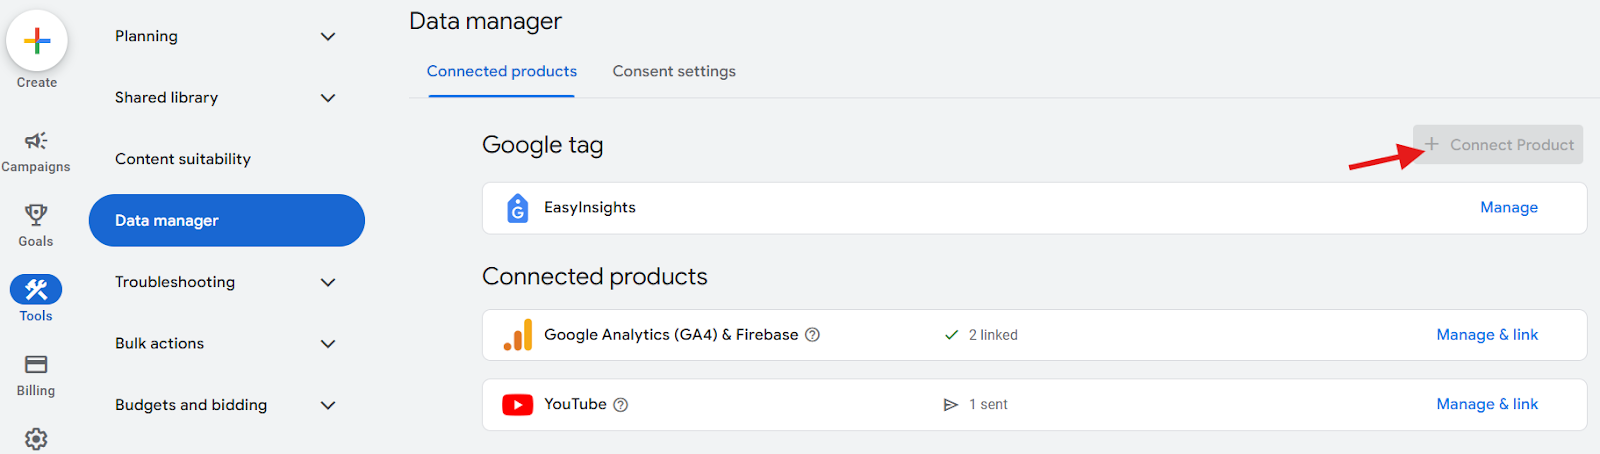
To begin installing the Google Tag, click on “+ Connect a Product.”
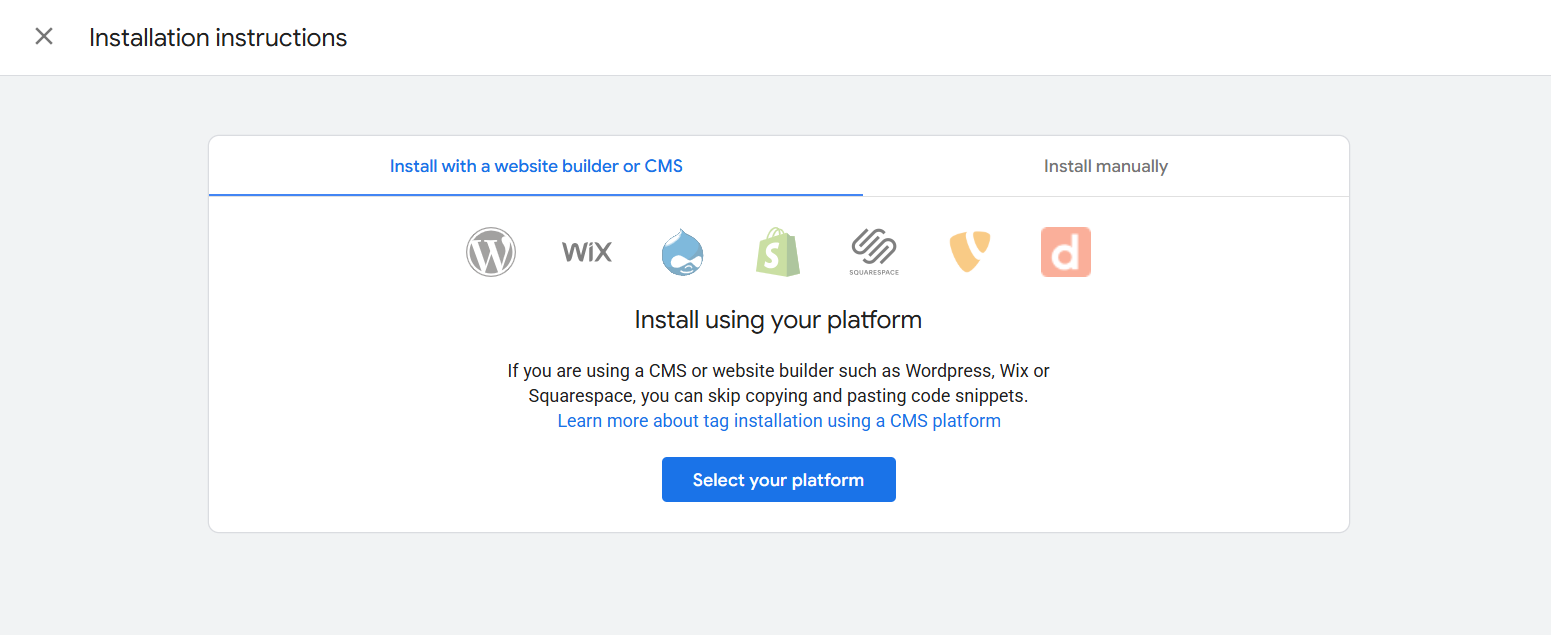
From there, choose one of the following installation methods:
- Use a website builder or CMS (like WordPress, Shopify, etc.)
- Install Manually (Manually add the tag code to your website’s HTML)
If you choose to install the tag manually, you’ll need to add the code snippet that appears on your screen after clicking Install manually.
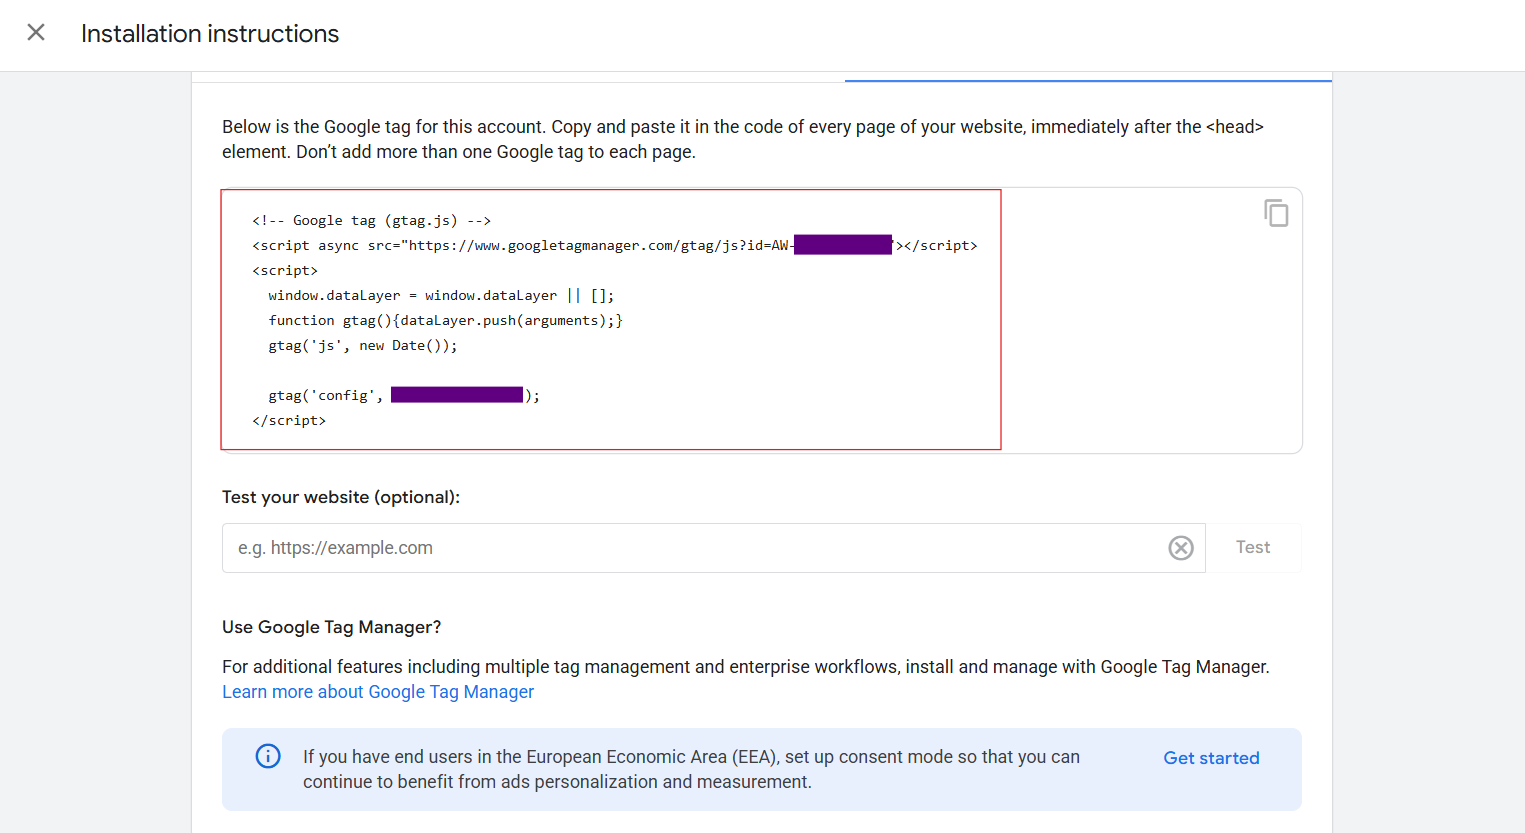
The displayed snippet code must be pasted into every page of your website, usually within the <head> section. If you’re tracking a button click, you’ll need to add the event snippet to the page where the button or link appears, and you may need to add additional code to trigger the conversion on click.
If you have the Google tag already installed on your website, you can skip the step of installing it again
Manually adding event snippets for conversion tracking
However, if you manually installed the Google Tag on your website, you’ll need to Follow this additional step to track conversions properly.
- In your Google Ads account, go to the Google Tag section.
- Click on “See event snippet” next to the conversion action you’re setting up.
Now you’ll choose how you want to track conversions:
- Page Load – Use this if the conversion happens after a user visits a specific page. Example: A customer reaches a thank you or order confirmation page after purchase or sign-up.
- Click – Use this if the conversion is triggered by a click on a specific element like: A button (“Buy Now”, “Submit”, “Sign Up”) or a link (“Download”, “Contact Us”)
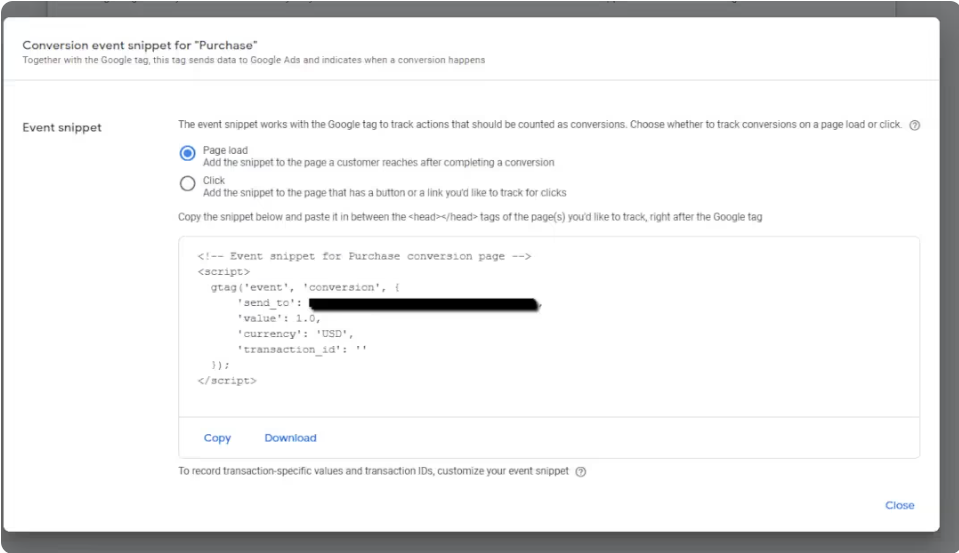
Once you’ve selected one, Google Ads will generate a matching event snippet.
Paste the event snippet within the head section of the conversion pages. This ensures that the conversion is recorded when someone completes the desired action. If the same conversion applies to multiple pages, make sure the snippet is included in each of those pages.
Verifying the Google tag by using Google Tag Assistant
Google Tag Assistant is a helpful tool for troubleshooting and ensuring your Google Ads tag is correctly installed on your website. It’s an essential tool for confirming that your tracking, conversion, or remarketing tags are firing properly. Here’s how you can use it within Google Ads:
- Navigate to Google Tag section → Go to Admin section → Launch Tag Assistant.
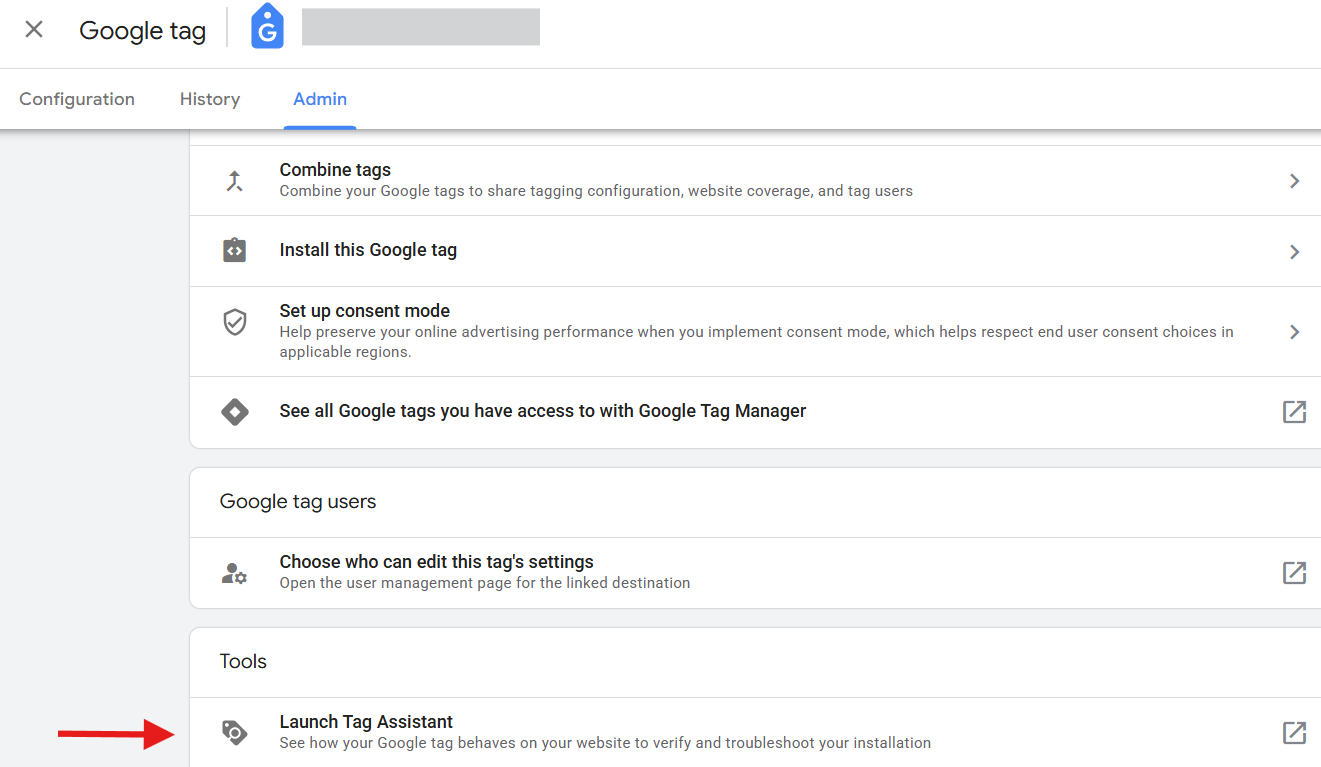
- Click on ‘Launch Tag Assistant‘; a new tab will open with the Tag Assistant tool.
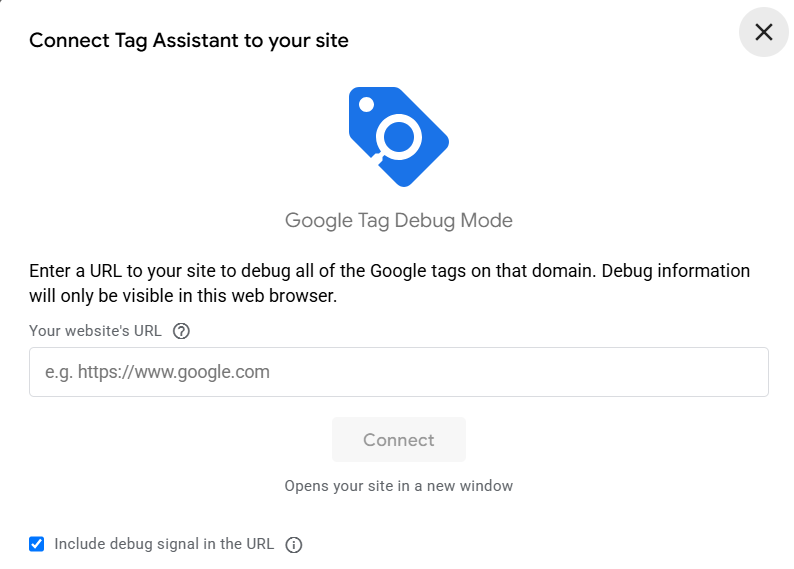
- Enter your website URL and then click on Connect
Once the Tag Assistant connects to your site, it will start analyzing the tags and displaying its results in real time. The results will tell you whether:
- The tag is firing correctly.
- There are errors or warnings that need your attention.
- Missing tags or incorrect configurations are detected.
If everything is working correctly, Tag Assistant will display a message like “Tag installed and firing successfully.” If there’s an issue, it will give you specific suggestions to fix the problem.
Example (“Tag missing on page” or “Page load delay detected”).
You can repeat the process for any other tags you have implemented on your site. This ensures that your site is properly tracking all the necessary actions for your advertising campaigns.
Additional reading: How to do facebook ads conversion tracking
Why EasyInsights is a game changer for the Conversion tracking
You can track user actions from the initial click to a purchase or lead submission, but that data is often incomplete or inaccurate when relying solely on pixel-based tracking. To truly scale your business, you need precise data and full visibility into what happens both before and after a conversion.
That’s where EasyInsights makes the difference. With EasyInsights’ advanced cross-domain tracking, you get accurate, end-to-end insights – not just pre-conversion behavior, but also critical post-conversion data that helps optimize campaigns, improve attribution, and drive real growth.
such as:
- Track the entire customer journey from first click to lifetime value
- Cross-platform user behavior: Connect interactions across domains and device
- Accurate attribution models: Attribute revenue to the right channels with confidence
- Repeat purchases: Understand customer retention and repurchase behavior
- Subscription renewals: Track recurring revenue events across platforms
- Upsells and cross-sells: Identify high-value actions beyond the initial conversion
- Improved campaign optimization: Feed complete data back into ad platforms for better automated bidding
Conclusion
Setting up Google Ads conversion tracking might seem technical at first, but it’s absolutely essential if you want to get the most out of your ad spend. With proper tracking in place, you gain real, actionable insights into what’s working – and what’s not – so you can make smarter decisions, improve campaign performance, and ultimately drive more valuable actions for your business.
Whether you’re using basic website conversions, enhanced conversions, or even importing offline data, accurate tracking ensures that Google’s machine learning can optimize for the goals that matter most to you.
For accurate tracking Book a demo with EasyInsights