Outbound marketing is the preferred approach for marketers at early-stage startups because of two simple facts – Firstly, because the startup is not yet an established and a credible “brand” so no one is actively searching for them on the Internet. And secondly, startups are known for providing disruption technology – so your target audience might not be aware that there’s a product out there that can solve their pressing problems with a specific methodology.
Therefore, outbound marketing is a good way to get relevant leads and in the process, grab mindshare of prominent people in your industry.
However, Outbound Email Marketing needs to be conducted carefully and consistently to yield substantial results. In this blog, I share with you a step-by-step guide on how I helped an early-stage startup that sells to large enterprises to grow from $0 to $1M ARR using the Outbound Email Marketing Channel.
Jump ahead to:
Step 1 – Identify the Target Audience for your Email Marketing Campaign
One of the best ways to identify your target audience is by conversing with Industry Veterans. They can be easily located on LinkedIn, and are also found on different forums associated with your product.

WHO ARE INDUSTRY VETERANS
Industry Veterans are the people who have worked, gained experience and used to be the decision-makers for successful companies, in the industry where you wish to operate. These individuals are now retired.
The idea is to approach them, and understand who are the stakeholders involved in choosing the vendors for the type of B2B SaaS Product you want to sell. It makes the process of lead prospecting more accurate
Step 2 – Create a Database
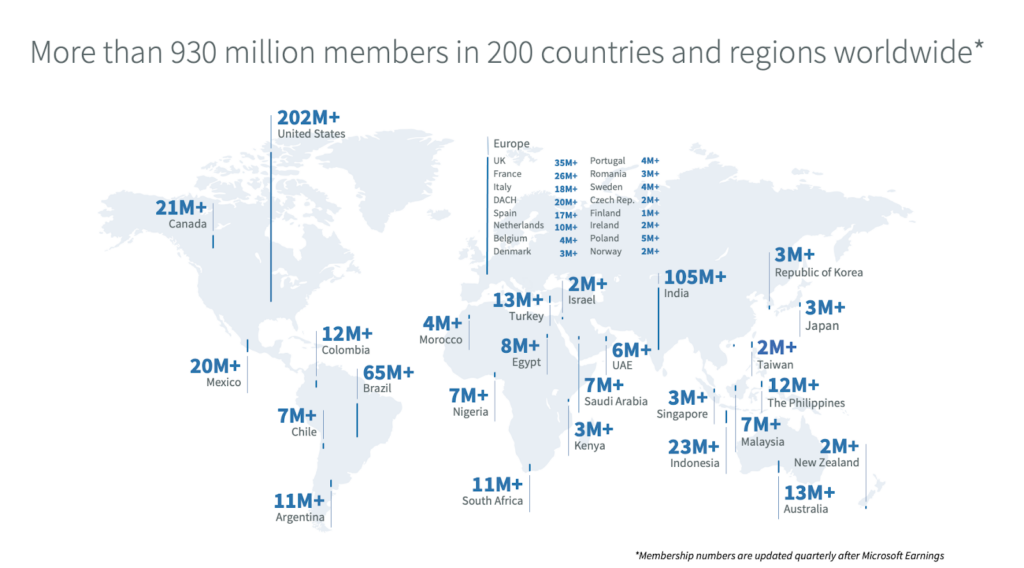
When it comes to outbound lead generation, I am a big believer in LinkedIn Sales Navigator which has around 930 million active users and lists over 63 million companies worldwide.
We have to focus on 2 databases – account and lead. In LinkedIn parlance, an account database consists of a list of companies that can be potential buyers of your product. LinkedIn Sales Navigator provides you with varied filters to create your account database – Number of Employees, Headcount growth, Revenue Details, and more
A lead database consists of your target audience whom you would be approaching via emails. Leads can be filtered on the basis of – Industry, Region, Company, Vertical (Sales/Marketing/HR, etc..), Years of Experience, Designation, and more. You can use Sales Navigator to find leads that fit your buyer persona.

PRO-TIP:
When reaching out to Enterprises via Cold Emails, it is good practice to create a negative filter. For example, if I want to pitch to an enterprise to automate their ETL and reverse ETL processes by using EasyInsights, then I would outsource their branding and lead generation activities to my organisation then I would want to reach out to the Marketing/Strategy/and other relevant departments. I would avoid the HR/Legal/Finance department because they might mark my email as Spam. This will adversely affect my email market
Step 3 – Use a Scraper to Collate the LinkedIn Data
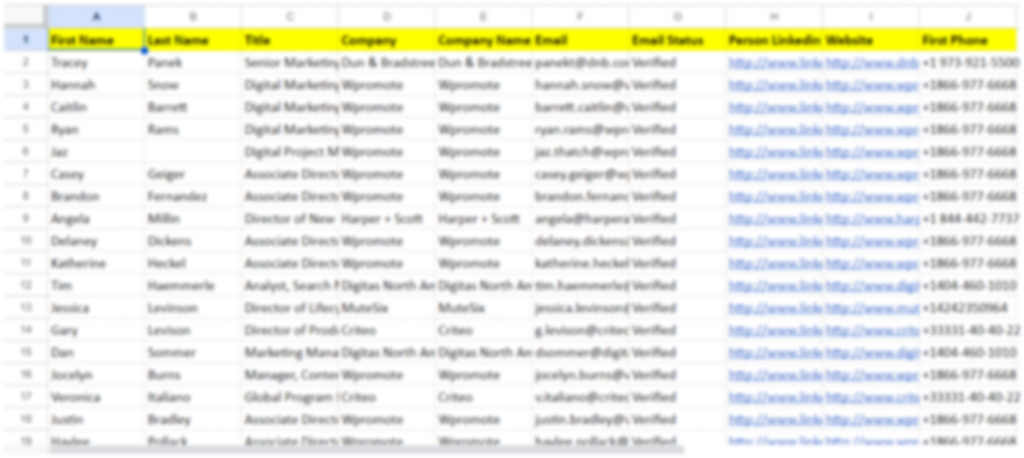
You have managed to find the relevant leads – but it’s a tedious job to open the LinkedIn profile of each and every lead to extract information. This is where a Scraping Tool comes in. By installing a Scraping tool extension1, you will be able to extract all information of the relevant lead and transfer it to a CSV/Excel file.
How to use a Scraper – After installing the scraper tool extension of your choice, click on it to extract information of the leads mentioned in your search results. The information will be transported to a csv or excel sheet which is your “list”. This is how your excel sheet would look like –
Step 4 – Refine the List Again
The scraper extracts all information that the lead has provided in their LinkedIn profile –
Name, Work History, Education Profile,Contact Information and more. The information we require for the purpose of our campaign is – Name, Current Company and their Designation, and Contact Information.
To avoid people marking your email as spam, ensure that your lead list is free of profiles that are not your target audience. Therefore, it’s good practice to apply a filter on the excel sheet and remove those profiles that are a part of your negative list.
PRO-TIP: THE DATA PRIVACY LAWS
One of the first tasks as you refine your lead list is to find out the country they are from. Many countries have strict Data Privacy Laws that protect receivers against any unsolicited email (like a cold email for email marketing purposes). It would be prudent to remove those contacts as legal action can be initiated against you if the receiver wishes so.
For example – Canada and Germany have strict laws against unsolicited emails and they should not be a part of your Email Marketing Strategy.
Step 5 – Find out the Correct Emails
It is our experience that the email addresses provided by scrapers are often incorrect leading to high bounce rates. Platforms like Clearbit Connect better serve the purpose here. You simply have to install the Clearbit extension and search about your lead, it would provide you with their email address. Alternatives are Lusha and Apollo.io, which also provides you with their Email and Contact.
So now you have email addresses from three venues – Scraper, Clearbit and Lusha. You will be able to notice a clear pattern in email addresses – use of only first name, use of both first and second name, adding country to domain name, etc.. Finalise a few email addresses based on the pattern you receive.
Step 6 – Test the Email Address
WHY FINDING THE CORRECT EMAIL IS IMPORTANT
Its important because your sender reputation can be penalised by email service providers like HubSpot, if your bounce rate is high. This can impact your overall ability to send email campaigns as your emails may end up being diverted to spam folders or not even be delivered.
One way which I have developed to confirm my lead’s email is as follows –
- If you have 300 relevant leads for a single company in a region, select 40 of the low seniority leads
- For sending test emails, change your email domain so as not to affect your sender reputation (say, switch from yourcompany.com to yourcompany.in)
- Send those 40 leads, the test emails on the email patterns you have shortlisted (test emails can be about requesting them to participate in a survey or requesting their contribution to an article)
- Wait for at least 48 hours. By this time, if an email is supposed to bounce, you will be notified.
This helps in narrowing down on the correct email address.
Step 7 – Create Impactful Content for Email Marketing
Here are some pro tips that you can put to good use when designing your email campaign –
- Keep the subject line to the point, and avoid words like “Offers”, “Bonus”, “Make Money” – you get the picture! These words are considered spammy and are most likely to land your email in the Spam Folder
- Keep a set of at least 5 emails in your sequence. You can anchor your emails by focussing and highlighting the USP of your product, to enhance both visibility and readability.
- Be mindful of adding images and also of the image size. A good marketing platform like HubSpot will tell you the spliit between Gmail and Outlook users. And Outlook does not automatically open images when an email is opened.
- People do not usually click links when receiving an unknown email. Therefore you should limit the links or if possible, not use them altogether. You can add your company link/product video in your Email Signature alongside your calendly/hubspot schedule link
The key is to keep the content short and crisp that best conveys your credibility ( mentioning your prominent clients’ helps) and the RoI your product generates.
Step 8 – Check for Email Domain Health
There are three Email Authentication Methods that are widely acknowledged – SPF, DKIM, and DMARC
What is SPF?
It stands for Sender Policy Framework and helps protect against email spoofing and phishing attacks – by allowing the recipient’s mail server to verify the authenticity of the sender’s domain. It is an important component of email security and is widely used to combat email fraud. Here’s how it works:
- The sender’s domain publishes an SPF record in its DNS (Domain Name System) settings.
- When an email is received, the receiving mail server checks the SPF record for the sender’s domain.
- The receiving server queries the DNS to obtain the SPF record.
- The receiving server then compares the IP address of the server sending the email with the list of authorised IP addresses in the SPF record.
- If the IP address matches one of the authorised servers, the email passes the SPF check and is considered authentic.
- If the IP address does not match any of the authorised servers or if there is no SPF record, the email may be treated as suspicious or potentially fraudulent.
What is DKIM?
It stands for Domain Keys Identified Mail and Its an email authentication method that verifies the authenticity and integrity of email messages. It works by digitally signing outgoing emails with a private key unique to the domain. The public key is then published in the domain’s DNS records. When an email is received, the recipient’s mail server retrieves the public key and verifies the signature, ensuring the email is not tampered with and originates from the domain it claims. Thus, DKIM helps prevent email spoofing and phishing attacks, enhancing email security and deliverability
What is DMARC?
It stands for Domain-based Message Authentication, Reporting, and Conformance and is an email authentication method that enhances domain protection. It combines SPF and DKIM to allow domain owners to specify policies for handling emails that fail authentication checks. DMARC helps prevent email spoofing and phishing attacks by providing instructions to receiving mail servers. It also enables reporting on email delivery and authentication failures. By implementing DMARC, domain owners can better protect their domains, improve email deliverability, and mitigate email abuse.
Check if you have the SPF, DKIM & DMARC Certification
There’s a free tool that I turn to to assess the health of my domain – https://mxtoolbox.com/emailhealth
It diagnoses your SPF, DKIM and DMARC health, and lets you know if there are any issues. It runs tests against your DNS servers and configurations. It also has a list of over 100 blacklists and checks if your domain has been listed or not. It runs one of the most comprehensive and exhaustive email diagnostics on the internet.
Step 9 – Design the Email Marketing Campaign
For designing your email campaign, make sure the following tasks have been completed –
- Choosing an Email Provider – To reduce bounce, use an Email Provider tool that has more lenient policies to protect your email domain. I prefer to use Mixmax
- Contact and Address – It’s required by law to add a physical address of your company, and a functioning contact number, to all your emails
- Unsubscribe – Its required by law to add an unsubscribe link
Now all you have to do is, schedule the emails. Divide your leads by country and schedule your bulk emails between 10AM – 4PM in the lead’s timezone That’s where I achieved the best open rates.
PRO-TIP:
Sending LinkedIn Connection Requests to your leads at the same time you are sending your Email Campaign can increase your chances of a response on either of the channels
Analysing the Email Marketing Campaign –
Your email provider will track the following metrics for you, with which you can measure the success of your campaign –
- Open Rates
- Bounce Rates
- Reply Rate
- A graph that plots when your emails were opened
- If the receiver was using Outlook/Gmail/Others
- The links clicked (and by whom)
- The fraction of the email body read – what percentage of people read 1/3rd of the email and so on..
PRO-TIP:
These metrics are powerful tools that help you optimise the email content. For example, if more people read only the top half of the email, you will ensure that your most impactful content/links/CTGA is present in the top half. Infact, with newsletters, almost 60% of the links clicked are located in the top-half of the email
Similarly, you will also schedule the email based on the time people are more likely to open them
Wrapping Up –
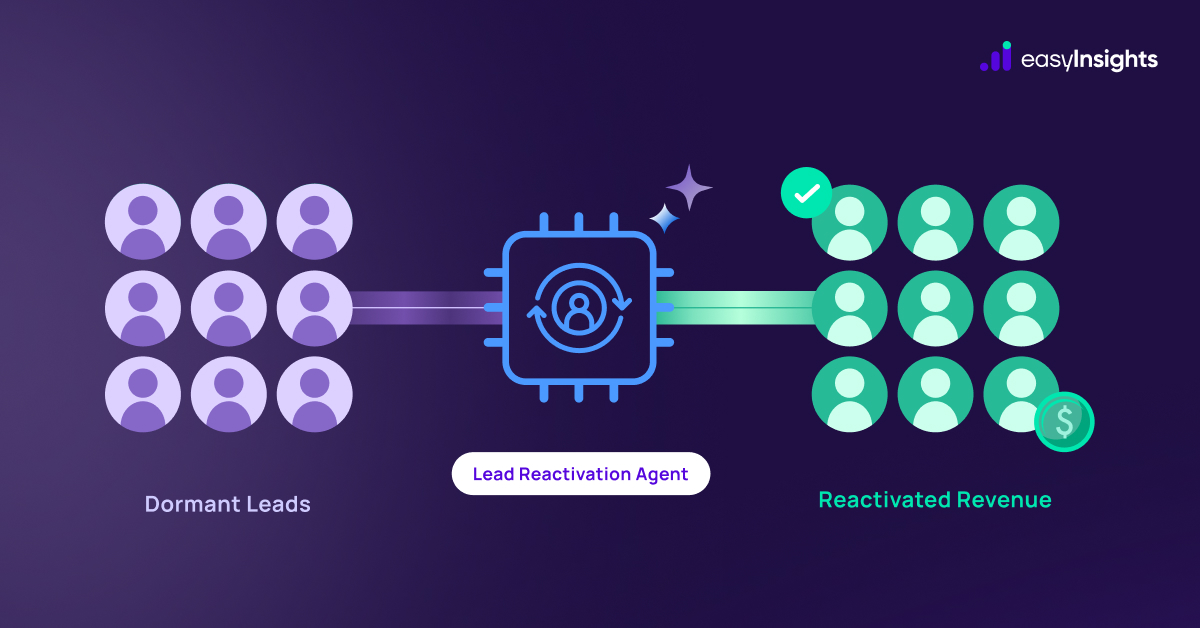
In conclusion, I’d say that although outbound lead generation via email-marketing would generate leads, it’s not something that lasts – because after a time, it would reach a saturation point. That is, your lead search will start providing you with the same names and chances of turning them into MQLs are very low.
The right plan of action here would be to run in parallel a content and branding strategy which improves your SEO, and therefore your visibility. This approach would yield better results in the long run. You can take the help of EasyInsights to execute this seamlessly. It will take care of your performance marketing needs by syncing data between your CRM, CEP, ad platforms and analytic platforms. With EasyInsights, you will essentially empower your marketing team by helping them automate the data stitching process across different marketing platforms, thereby providing them with full-funnel visibility of their marketing efforts.
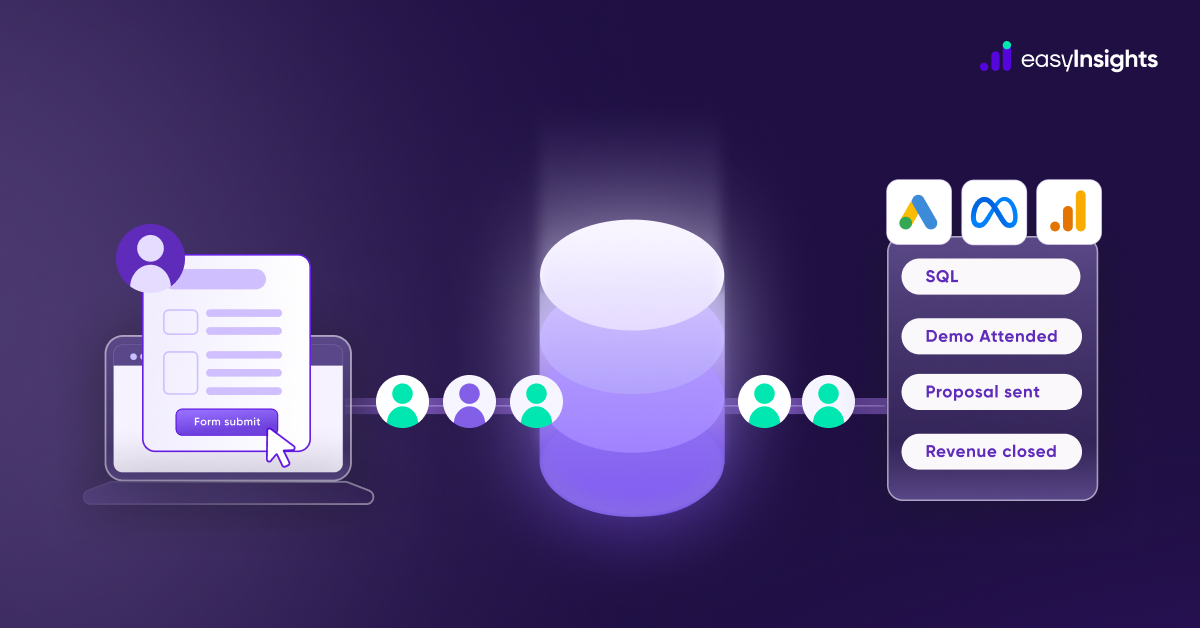
You can now map your customer journey, correctly attribute your conversions, activate your raw first-party data and enrich them to power your marketing campaigns. Here’s how
How EasyInsights can help you work better with Ad Platforms
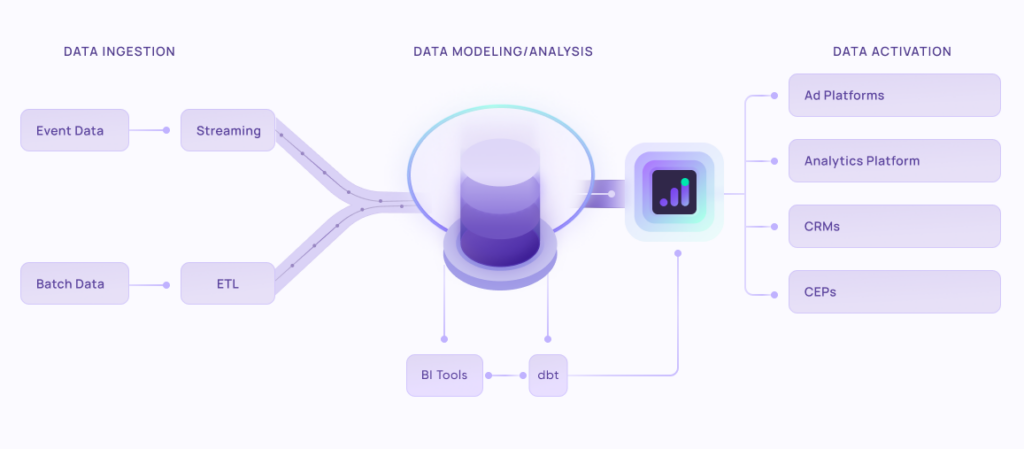
EasyInsights works with raw data for data activation and data enrichment in a few key ways:
Data Collection and Transformation:
- EasyInsights connect directly to your ad platform allowing it to access and extract the raw data you’ve collected.
- Data Transformation: EasyInsights then cleans, normalizes, and enriches the data to make it usable for activation purposes. This may involve tasks like:
- Formatting data: Ensuring all data points are in a consistent format.
- Handling missing values: Filling in missing data points or removing them according to your preferences.
- Enriching data: Adding additional data points from other sources to create a more comprehensive picture of your customers.
Data Activation:
- Segmentation and Targeting: It allows you to segment your audience based on various criteria like demographics, behavior, and interests using the enriched ad platform data.
- Multi-channel Marketing: You can then use these segments to activate your audience across different marketing channels like email, social media, and advertising platforms.
- Customer Relationship Management (CRM): The data can be used to personalize outreach and interactions with customers within your CRM system.
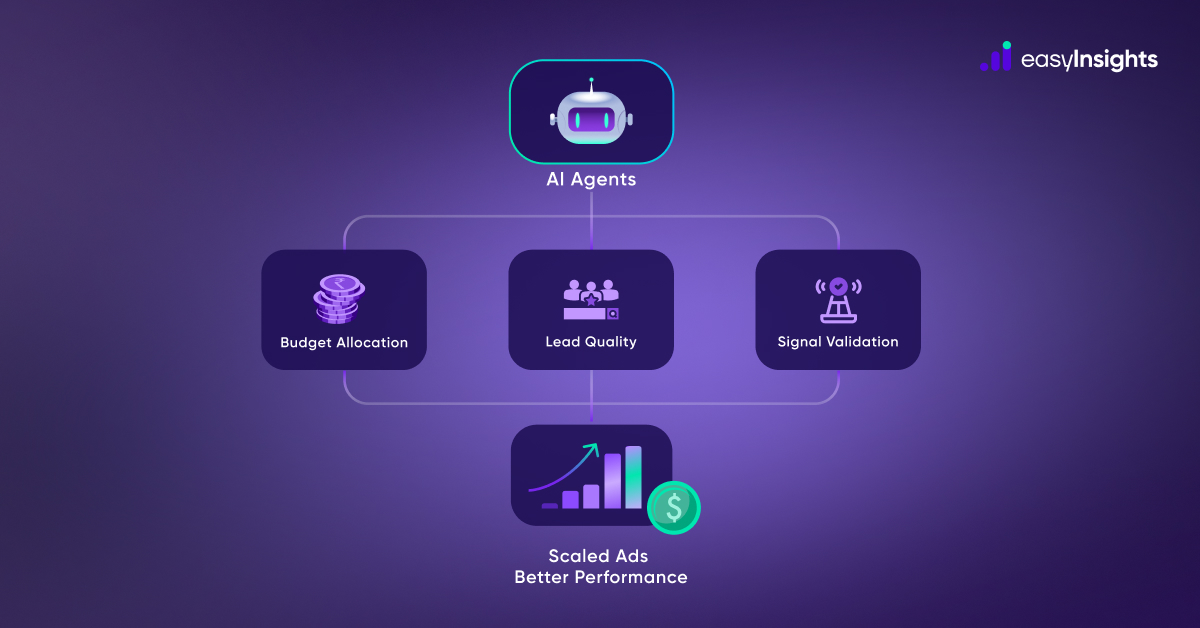
- Marketing Attribution: EasyInsights can help you understand how different marketing channels contribute to conversions and optimize your marketing spend accordingly.
Key Feature:
- Offers features like customer data platform (CDP) capabilities, marketing automation, and campaign management tools.
- Focuses on reverse ETL (extracting data from your warehouse and sending it to marketing tools) and offers pre-built integrations with various marketing platforms.
EasyInsights is a marketer’s preferred tool for first party data activation.
In this age of cross-channel marketing, EasyInsights offers a comprehensive platform to collect, store, and transform all your first-party data.
EasyInsights enhances marketing campaign efficiency in a cookieless landscape with accurate ad signals. It helps brands step away from surface-level metrics and unleash the potential of first-party data to optimize marketing strategies, ensuring a superior Return on Ad Spend (ROAS). It does all this, while being a highly affordable no-code platform with an exceptional customer support apparatus.
Sign up for a demo today to see EasyInsights in action.