Meta Business Manager is a part of Meta Business Suite and acts as your all-in-one hub to securely manage and organize your Facebook assets. Whether you’re a one-person operation or have a team behind you, this tool simplifies your work and keeps everything streamlined.
Think it’s hard to set up? Don’t worry! This guide makes it easy with just 10 simple steps, helping you go from setting up your account to launching your very first ad campaign.
Let’s explore what Facebook Business Manager is, why it’s essential for your brand, and how you can get started.
Jump ahead to:
What is Meta Business Manager?
Meta Business Manager (formerly known as Facebook Business Manager) is something that brands can use to make managing a brand on the platform as easy as possible. Meta describes it as a tool for brands to centralize all their Facebook marketing including partner and collaborator initiatives.
It’s your go-to dashboard for handling everything related to Facebook marketing and advertising. It’s also a secure way to manage who can access your Facebook Pages, Instagram accounts, and even your product catalogues. Here’s what it can do for you:
- Track all your Facebook and Instagram ads in one place, complete with detailed performance reports.
- Give access to external partners, vendors, or agencies without losing ownership of your assets.
- Keep your business activities and personal Facebook profile separate, so you won’t accidentally post work updates to your page or get distracted by funny memes.
If you’re wondering whether you need to set up a Meta Business Manager account, here’s a breakdown of who benefits the most from it.
Why you should Create a Meta Business Manager Account?
Not sure if you need a Meta Business Manager? If you find yourself in any of these situations, it’s worth setting up:
- You’re a social media manager: If managing social media is part of your job, Meta Business Manager is the perfect tool for you. It allows teams to collaborate and manage Facebook and Instagram Pages or ad accounts without hassle.
- You’re a creator or business owner: If you’re running your brand, this tool helps you stay organized and separates your profile from your business. Your audience won’t see your private Facebook details, only the information you decide to share, like your business email, Page details, or ads.
- You manage multiple accounts: If you handle several Facebook Pages, ad accounts, or Instagram profiles, Meta Business Manager lets you bring everything together in one place for easy management.
- You work with agencies or freelancers: Collaborating with external marketers? This tool makes it simple to grant them access to your accounts without handing over ownership of your business assets.
If any of these scenarios sound like you, it’s time to set up your Meta Business Manager account and start managing your brand.
Additional Reading: Facebook Conversions API ( CAPI ) – Comprehensive Guide for Performance Marketers
How to Set Up Meta Business Manager in 10 Easy Steps
Before you dive into setting up your Meta Business Manager account, there are a couple of things you need to know:
- A personal Facebook account is required: You’ll use your personal Facebook account to log in and verify your identity. Don’t worry this doesn’t mix your personal information with your brand.
- Limit of two accounts: You can only create up to two Meta Business Manager accounts per person.
Once you’ve got those details in mind, follow the below steps to get started
Step 1: Create Your Meta Business Manager Account
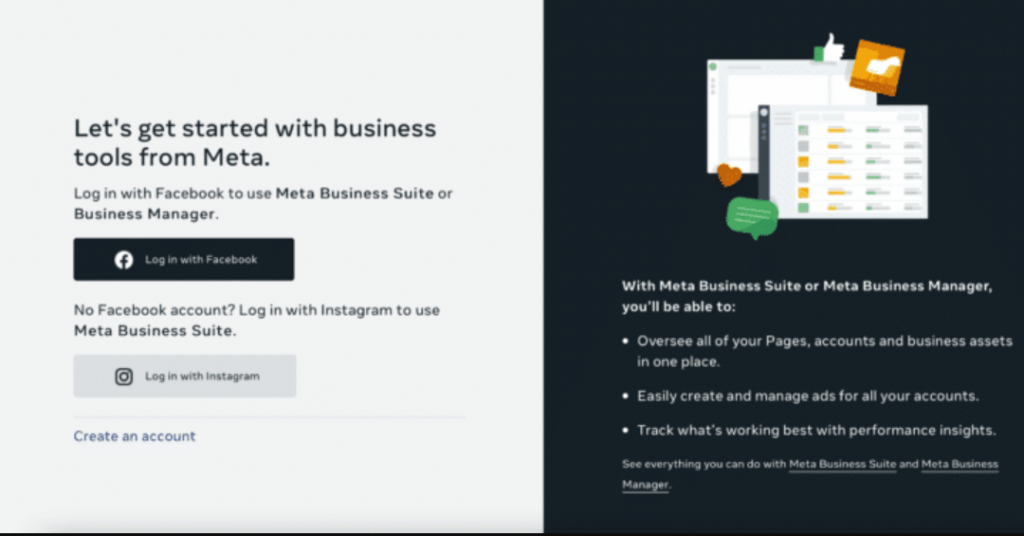
1. Open your browser and go to business.facebook.com.
2. Use your existing Facebook login credentials to access the site or create a new account if needed.
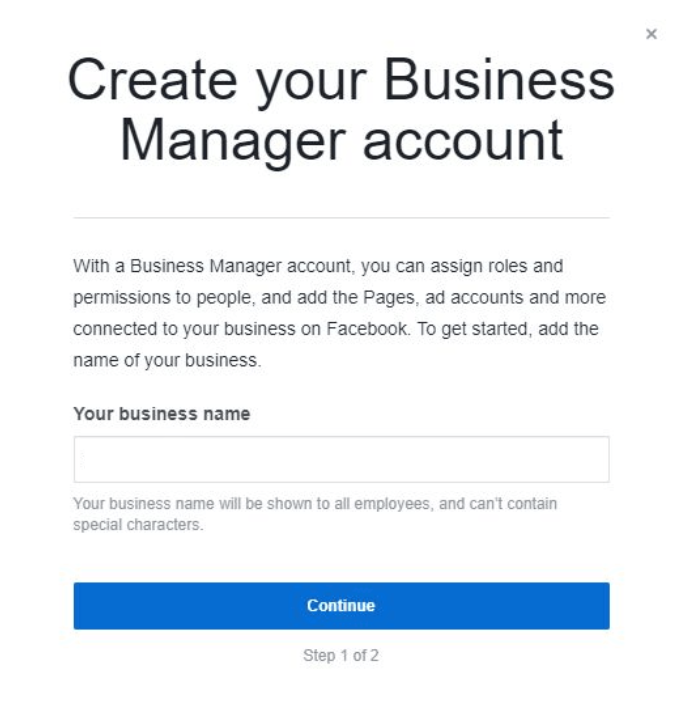
3. When creating your business account in Meta Business Manager, some essential information includes your business name/ account name. You will also need to confirm your identity by entering your full name and work email address. After you have entered these fields, click “Submit” and you will get a business account for your brand.
4. You will receive an email with the title “Confirm your business email.” The position of the hot zone is inside the message and there by clicking on the option, which is Confirm Now.
5. After that’s done, the next step is to input your brand information into the site. Such information pertains to your business entity’s registered name and address, phone contact, and website.

Step 2: Link Your Facebook Business Page
Now it’s time to connect your Facebook Business Page to your Meta Business Manager account. You have a few options here:
- Add an existing page you already manage.
- Create a brand-new page if you don’t have one yet.
- Request access to someone else’s page if you manage accounts for clients or other brands.
- Create a new Facebook Page if you don’t already have one.
- Claim an existing Facebook Page you own.
- Request access to manage someone else’s Facebook Page.
If you’re claiming an existing Facebook Page, type the name of your business page in the search box. Once the name pops up, select it. If you’re the admin of that page, your request will be approved automatically.
Step 3: Connect Your Facebook Advertising Account
When you add your Facebook ad account to Meta Business Manager, remember that once it’s connected, it cannot be unlinked. Therefore, solely include ad accounts that you possess. If you require entry to a client’s ad account, be sure to utilize the Request Access feature instead. Here’s how to link your ad account if you already have one:
1. Go to your Business Manager dashboard and click Add Ad Account.
2. Click Add Ad Account again when prompted.
3. Enter your ad account ID (you can find this in your Ads Manager).

If you don’t have a Facebook ad account yet, you can create one similarly to adding a Page:
1. Open the Business Manager menu and choose Business Assets.
2. Click the blue Add Assets button in the top-right corner.
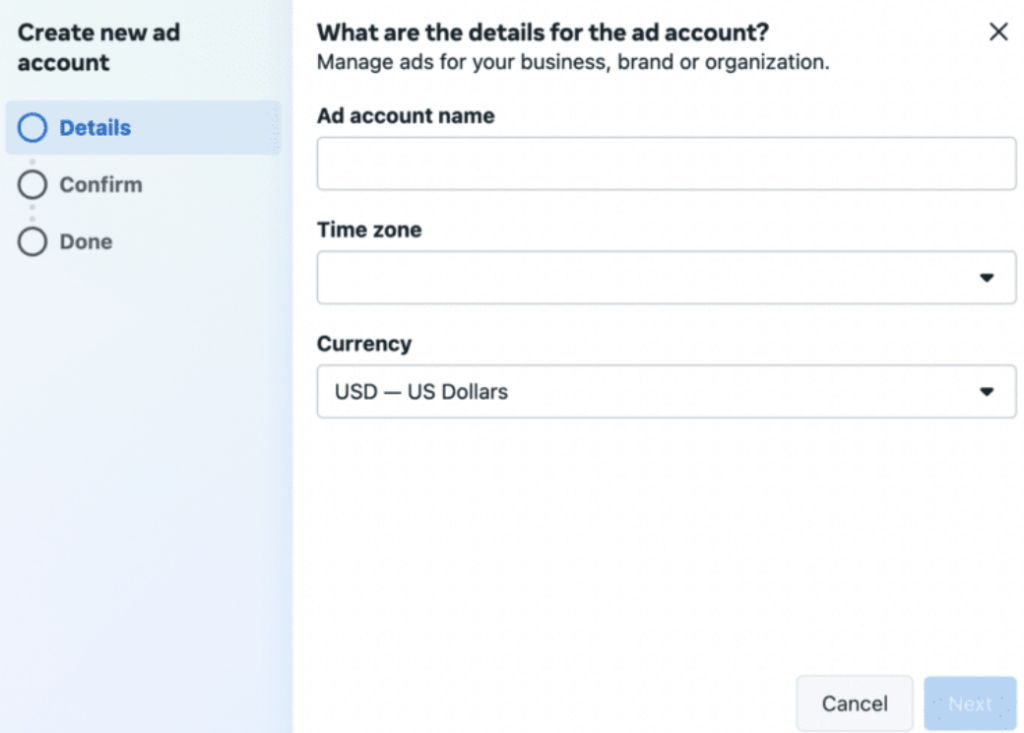
Follow the instructions to create a new ad account, and you’re all set!
Step 4: Add People to Help Manage Your Facebook Business
Handling Facebook marketing on your own can be overwhelming. Thankfully, Meta Business Manager allows you to bring on a team to help manage your business assets, like your Facebook Page and ad campaigns. Whether it’s employees, contractors, or partners, you can easily add them and assign specific roles to ensure everything runs smoothly. Facebook offers three levels of access:
Before adding anyone, you need to know what level of access to give them. Meta offers different levels of access depending on what the person needs to do:
1. Full Control
- This role is for business owners or managers who need complete access to everything.
- They can manage all account settings, assign tasks, control tools, and even delete the account if necessary.
- Best for those who oversee the entire operation.
2. Partial Access
- Perfect for team members or external vendors who only need access to specific tasks or tools.
- They can manage assigned activities, such as creating ads or posting on the Page, without full account control.
3. Advanced Options
- Designed for individuals who require access to financial tools and billing info (e.g., finance analysts or editors).
- Can be added as an extra layer to Full Control or Partial Access roles.
How to Add People to Your Business Manager
Now that you know the roles, here’s a step-by-step guide to adding team members:
1. Go to People Settings
- From the Business Manager menu, click on People.
- In the top-right corner, select the blue button that says Add People.

2. Enter Their Email Address
- Type in the business email address of the person you want to add.
- This could be an employee, contractor, or partner. Remember, at this step, you’re inviting individuals, not agencies or other businesses.
3. Assign a Role
- Choose the level of access you want to grant: Full Control, Partial Access, or Advanced Options.
- Be thoughtful about permissions; only give Full Control to someone you completely trust, as they will have authority over everything.
4. Send the Invitation
Once you’ve set the role, click Send Invite. The person will receive an email with a link to accept and join your Business Manager account.
Step 5: Link Your Business Partners or Ad Agency
If you’re working with an ad agency or business partner, you can grant them access to manage your Facebook assets. If you’re just starting, you can skip this step for now and return to it later when needed.

- Go to Business Settings in your Business Manager dashboard.
- Click on Partners from the left menu. Choose to add a partner with whom to share assets.
- Ask your partner or agency for their Business Manager ID (they can find it under their Business Info). Enter the ID and click Add.
Once added, the partner can manage their team’s access to your assets from their own Business Manager account, so you don’t have to handle permissions for individual team members.
Step 6: Link Your Instagram Account
You can connect your Instagram account to Meta Business Manager to manage both platforms in one place.
1. Open Business Settings in your dashboard.
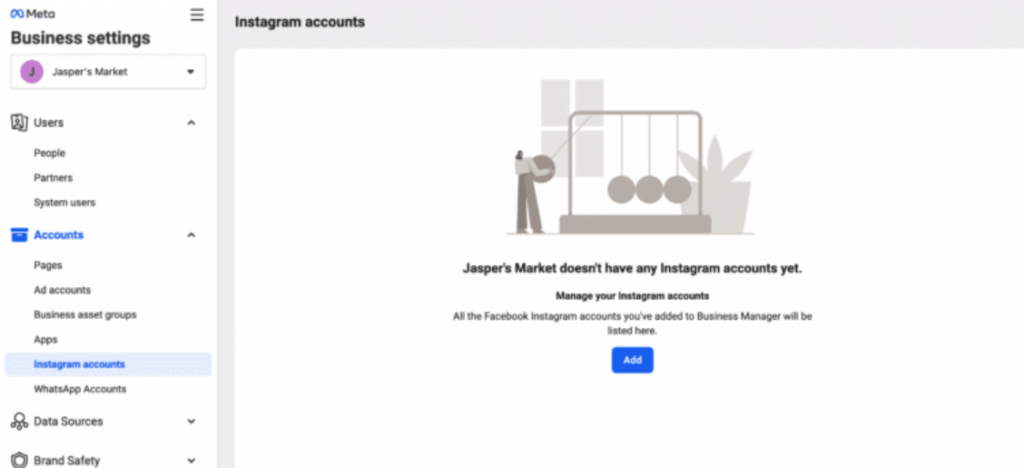
2. Click Instagram Accounts on the left menu, then Add.
3. Enter your Instagram login details in the pop-up box and click login to link your account.
Now you’re ready to manage your Instagram and Facebook business activities!
Step 7: Setting Up Facebook Pixels
A Facebook Pixel functions as a tracking mechanism for your site. It’s a brief segment of code that assists Facebook in gathering crucial information regarding the individuals accessing your website. This information can enhance your advertisements, monitor sales or registrations, and target the correct audience with ads. Even if you’re not prepared to launch ads at this moment, installing a Pixel now guarantees you’ll gather useful data for when you decide to begin advertising. Here’s a way to arrange it in easy steps:
- Access Business Settings: Navigate to your Meta Business Manager dashboard and choose Business Settings from the menu.
- Locate Pixels: On the left side, beneath Data Sources, select Pixels, and then press the Add button to set up a new Pixel.

After creating your Pixel, you can follow simple steps to integrate it into your website and begin collecting data immediately. This will prepare you for more intelligent ad campaigns when the moment arrives!
- Give your Pixel a name (keep it short). Add your website address so Facebook can suggest the best setup for your Pixel. Once you’re done, click Continue. Before moving forward, make sure to read and agree to Facebook’s Pixel terms and conditions.

- Next, click Set up the Pixel Now to start the process.
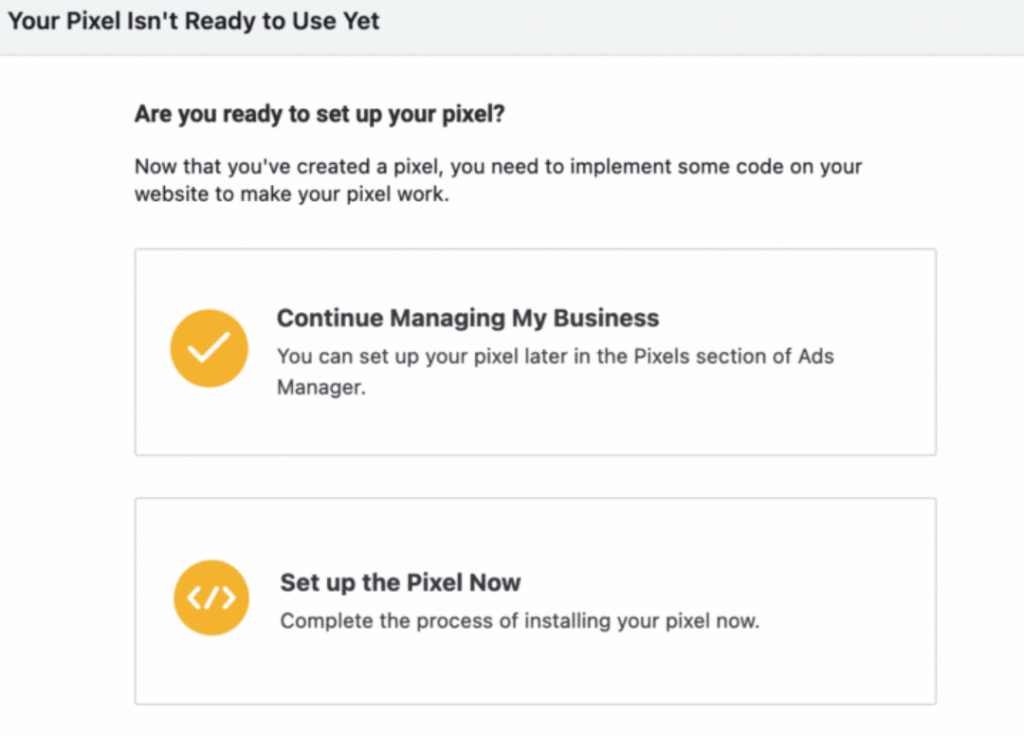
- Follow the simple steps provided in Facebook’s setup guide to add the Pixel to your website. Once it’s set up, it will start collecting data that you can use to improve your ads.
Remember, you can create up to 100 Pixels in your Meta Business Manager account, giving you plenty of flexibility to track different projects or brands!
Additional Reading: What Are Tracking Pixels and How Do They Work?
Step 8: Strengthen Your Account’s Security
Meta Business Manager offers tools to keep your brand assets secure, making it an essential step for protecting your pages, ads, and other valuable resources.
1. Open your Business Settings from the Meta Business Manager dashboard.
2. Navigate to the Security Center in the left-hand menu.
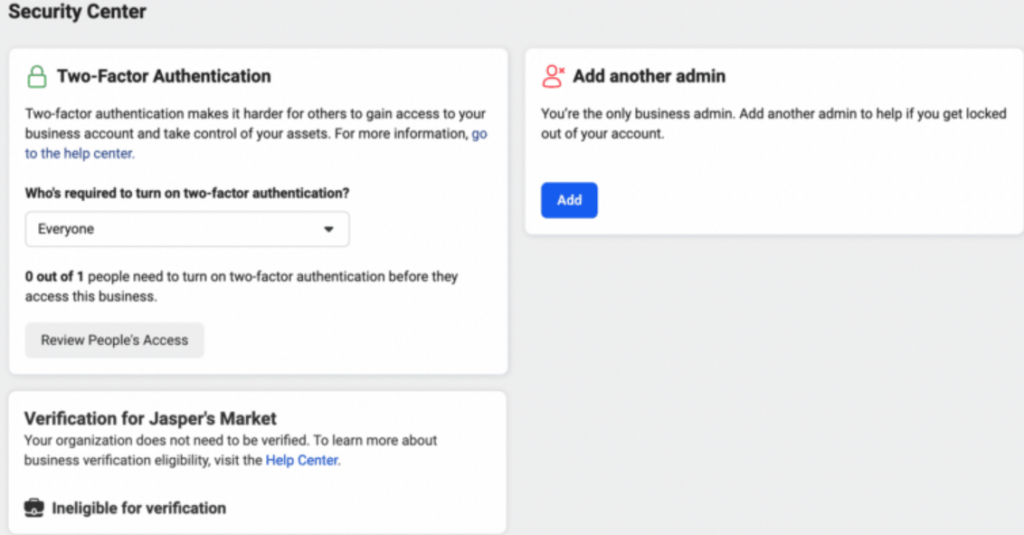
Taking these steps now will save you from potential security risks down the road, ensuring that your account and data are protected.
3. Boost your account’s security by enabling two-factor authentication (2FA). This means that every time someone logs into your account, they’ll need to provide a verification code in addition to their password.
Step 9: Launch Your First Ad Campaign
Once your account is fully set up and your Facebook Pixel is ready, it’s time to run your first ad campaign! We’ve created an in-depth guide to help you design impactful and effective Facebook ads, covering strategy and detailed tips. Here, we’ll keep it simple and focus on the steps to create your first ad using Meta Business Manager.
1. Head over to your Business Manager dashboard and select Ads from the menu on the left-hand side.
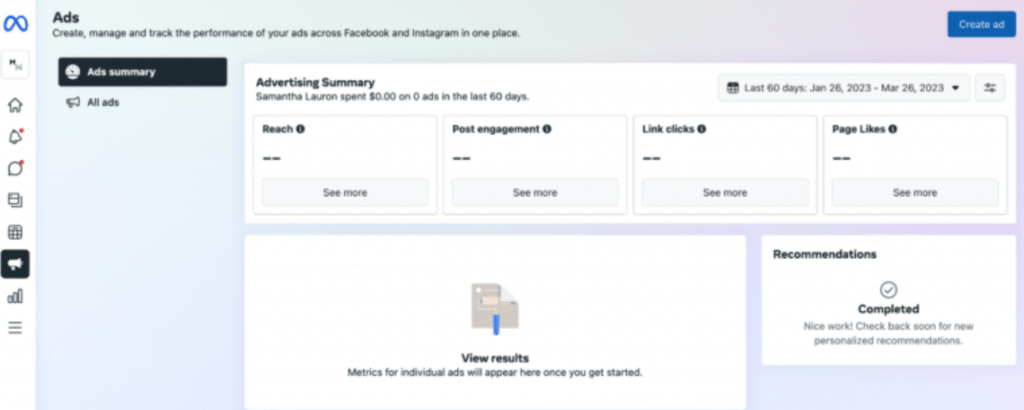
From here, you’ll start the process of setting up and customizing your ad campaign to reach your target audience!
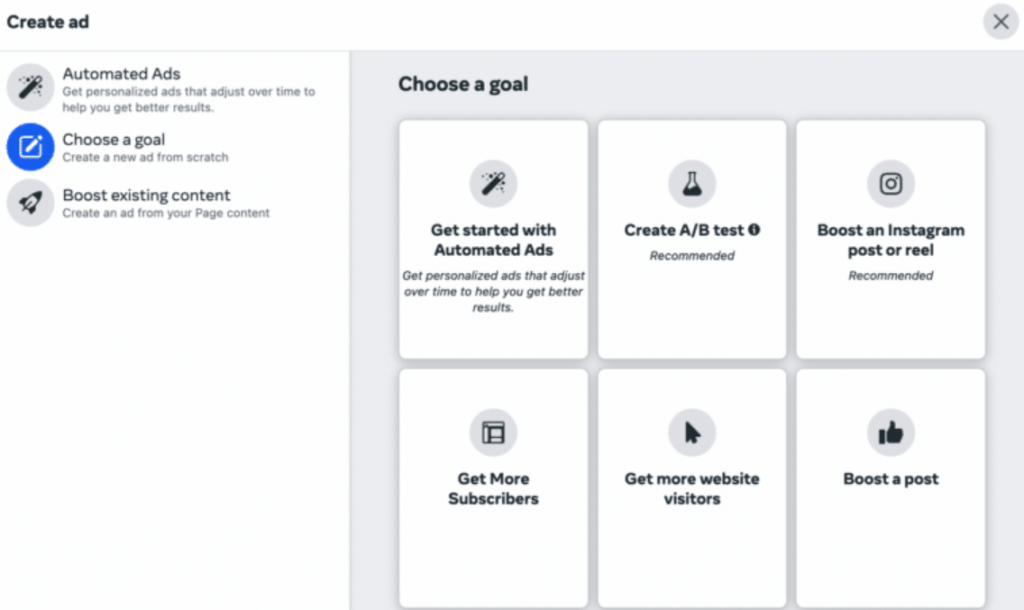
2. Once you are in the ads dashboard, you will get a summary of how any of the recent ads have performed. To create a new ad, just click Create Ad. This button is bright blue, positioned in the right top corner of the page.
3. Set your goal, pick your audience, decide your budget and schedule, and choose your ad type and placements. You can boost an existing post or let Facebook suggest options with Automated Ads. Simple and effective!
Step 10: Ads Review, Ads Analysis & Optimization
It must be very clear that nobody shuts his/her eyes after the first ad campaign has been created. This is crucial because to get the best out of the Meta Business Manager tools it is best to review its performance from time to time. Here’s how:
- Monitor Performance: Check key metrics like reach, clicks, and conversions in Ads Manager.
- Know Your Audience: Use insights to understand who’s engaging with your ads.
- Test Ideas: Run A/B tests to compare ad elements and find what works best.
- Adjust Budget: Focus spending on top-performing ads.
- Retarget Visitors: Use Facebook Pixel to re-engage people who visited your site.
By consistently reviewing and refining your approach, you’ll ensure your campaigns remain effective, drive results, and help grow your brands.
Conclusion
From setting up your brand assets to launching and optimizing ad campaigns, it centralizes all your tools in one secure hub. By following the step-by-step guide outlined above, you can set up, manage, and track your campaigns with ease. To take your marketing strategy further, consider integrating tools like EasyInsights.
The Main benefits of extending Meta Business Manager with EasyInsights is the ability to work with data, increase campaign ROI, and get the most out of your marketing. Sign up for Meta Business Manager today and enhance your outcomes. EasyInsights allows you to activate and leverage your Facebook data by automating audience segmentation and sending high-quality, intent-driven signals from your CRM to Meta Ads. This enables you to optimize ad performance and achieve significantly higher ROAS. By combining the robust capabilities of Meta Business Manager with the advanced analytics and automation provided by EasyInsights, you can create a powerful system to drive better results from your campaigns.
Take the next step in your Facebook advertising journey partner with EasyInsights and transform how you manage, analyze, and act on your data.


