Custom labels in Google Shopping and Performance Max campaigns let you tag products with values like “seasonal,” “clearance,” or “best seller” to organize and manage your ads more effectively. These labels don’t appear in your ads but help you group products for better reporting, targeting, and bidding strategies. You can assign up to five custom labels per product in your Merchant Centre feed, making it easier to focus on specific product sets within your campaigns.
Why Use Custom Labels?
Let’s say you’re running ads for 1000+ products, but you only want to focus on promoting summer items, or maybe products that are on sale. Custom labels let you group these products under tags like:
- seasonal
- clearance
- best_sellers
- high_margin
- new_arrival
This helps you:
- Track performance of specific product types
- Adjust your bidding strategy (e.g. bid higher for best sellers)
- Create campaigns around specific product groups more easily
How to Use Custom Labels
Using custom labels in your product feed helps you group products based on rules you create, like seasons, performance, profit margins, and more.
Set Your Own Rules: Decide what each custom label will represent and the possible values it can have. For example:
| Custom Label | What It Means | Examples of Values |
| custom_label_0 | Season | Winter, Spring, Summer, Fall |
| custom_label_1 | How well does it sell | BestSeller, LowSeller |
| custom_label_2 | If the item is on clearance | Clearance |
| custom_label_3 | Profit margin | HighMargin, LowMargin |
| custom_label_4 | The year the product launched | Any year (e.g. 2012, 2024) |
Step-by-Step Guide to Creating Custom Labels in Google Ads Product Sets
1. Access Your Google Merchant Centre Account
- Visit: https://merchants.google.com
- Sign in with your associated Google account.
- Ensure you’re in the correct Merchant Centre account linked to your business.
2. Navigate to Your Product Feed
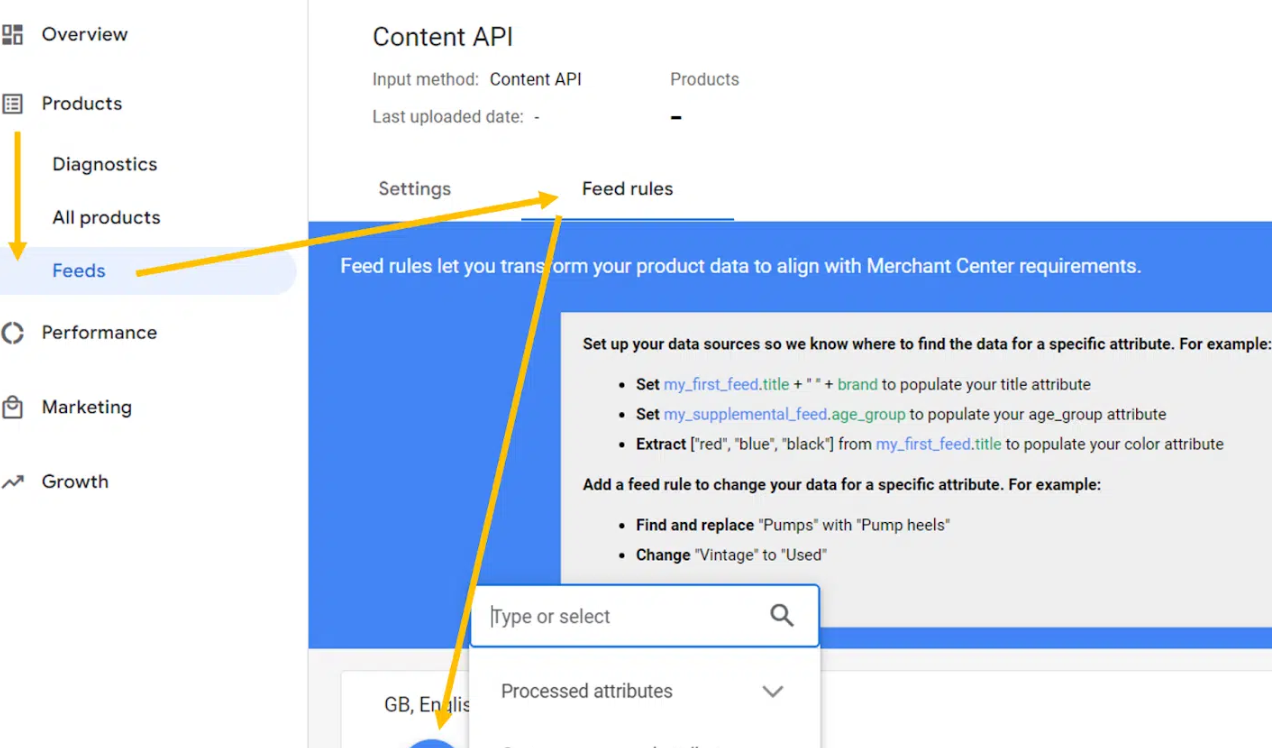
- On the left-hand menu, click on “Products” > “Feeds”.
- You’ll see a list of your active data feeds. Click on the feed you want to edit (usually your primary feed).
3. Add Custom Labels to Your Feed
Custom labels allow you to group and segment your products for Shopping campaign bidding strategies. You can use up to five custom labels (custom_label_0 to custom_label_4).
Option A: Using Feed Rules (Recommended if using Merchant Centre directly)
- In your feed, click on “Feed Rules” at the top.

- Click “Create Rule”.
- Choose a destination attribute: Select custom_label_0, custom_label_1, etc.
- Define the condition for when this label should apply.
Example:
- If product price is above ₹5,000 → custom_label_0 = “HighValue”
- If the product title contains “Winter” → custom_label_1 = “Winter”
- If product price is above ₹5,000 → custom_label_0 = “HighValue”
- Click “Apply”, and then “Save as draft”.
- Once you’ve reviewed the rule, click “Save and Apply” to push the changes.
Option B: Manually Editing the Feed
If you manage your product feed using a spreadsheet, or any third-party tool (like DataFeedWatch, WakeUpData, FeedArmy), or CMS (like Shopify), do the following:
- Open your feed file (CSV, Google Sheets, or Excel).
- Add new columns named custom_label_0, custom_label_1, up to custom_label_4.
- Fill in values for each product based on how you want to segment them.
Examples:
- custom_label_0: “Summer”, “Winter”
- custom_label_1: “Clearance”, “Bestseller”
- custom_label_2: “Under500”, “500to1000”
- Save your feed and upload it again to Google Merchant Centre via:
- Scheduled fetch
- Manual upload
- Content API
4. Submit the Updated Feed
- After editing or applying feed rules, go back to Feeds.
- Click your feed and hit “Fetch Now” (if using scheduled fetch).
- Wait for Google to process the feed. This may take a few minutes to several hours.
- Ensure the feed has no errors related to custom labels.
5. Verify Custom Labels in Google Merchant Centre
- Navigate to Products > All Products.
- Click on any product.
- Scroll to find the custom_label_0, custom_label_1, etc.
- Confirm that values are correctly assigned.
6. Link Google Merchant Centre to Google Ads
If not already linked:
- Go to Tools & Settings > Linked Accounts in the Merchant Centre.
- Under Google Ads, click “Link Account”.
- Enter your Google Ads Customer ID.
- Approve the request from the Google Ads interface.
7. Create or Modify a Shopping Campaign in Google Ads
- Go to https://ads.google.com and log in.
- Navigate to Campaigns > +New Campaign or choose an existing Shopping campaign.
- Choose Sales as your goal > Select Shopping Campaign > Link to your Merchant Centre account.
- Finish the campaign setup or open an existing one to modify.
8. Set Up Product Groupings Using Custom Labels
- In your Shopping campaign, go to the Ad Group level.
- Under Product Groups, click the pencil icon to edit.
- Click “Add subdivision”.
- From the dropdown, choose Custom label 0, Custom label 1, etc.
- Select the value you assigned in the feed (e.g., “Winter”, “HighMargin”, “Clearance”).
- Click Save.
This will segment your product groups based on your custom strategy.
9. Monitor and Optimize
- Go to Campaigns > Product Groups regularly.
- Analyze the performance of each custom label group.
- Adjust your:
- Bids
- Labels in the feed
- Product segments
- Ad creatives and targeting
- Test new label strategies based on metrics like ROAS, CPC, and conversion rate.


