Slicing up data is something that most people who need to compile results from various sources probably have to do on a fairly regular basis when it comes to their job. A good example of how one has to correct data formatting can be seen when working with text.
Perhaps you have run into a situation where you want the first and last names in separate columns. For example, if someone uses your spreadsheet as an address book but wants to ensure each surname gets its line.
What if you want to separate a complete address in cells into columns? For instance, let us say you want to separate house number, street name, city, and state from your customer address?
Thankfully, it is straightforward to split up a cell’s content into multiple columns with the Google Sheet functions. There are a couple of ways to split cells in the Google Sheet. Here is how you can do it:
1. Split Cells With Menu Option
2. Split Cells Using Formula
Also read: How to sort Google Sheet data by date?
Jump ahead to:
Split Cells With Menu Option
You can use the menu option to split cells in sheets if you do not want to deal with formulas or if your data will not change in the future.
Here are the steps to follow:
Step 1: Click on the cell you want to split, click on the Data menu, and choose the split text to columns option.

Step 2: Your data will automatically split into different columns

Note: Google Sheets will look at the data and determine what character to use as a separator to split the text. If you want it to use a different character, simply click on the dropdown menu that appears and choose the correct option for your data.
Split Cells Using Formula
Suppose your data is likely to change later. In that case, you can save yourself the hassle of having to edit the formulas whenever there is a chance.
In this case, rather than using a formula for each column, it might be easier if you go ahead and key in all of the values into one area. Every time you want to change a certain value, you can easily do it as there is a formula that helps change every other adjacent value across the row.
Here are the steps to follow
Step 1: Select the column where you want the output to appear, type (=), and you can start typing the formula.
Step 2: Enter SPLIT () formula.
When you want to split a cell, the first thing you need to know is the cell reference that you want to split. In order to do this, you must highlight the cell or cells it will be cut into and insert a comma in front of your separator or delimiter, which needs to be something other than spaces or commas.

If we want to separate cell A1 using a comma as a delimiter, the formula is “=SPLIT (A1,”,”)”.
Note: This formula is a way to display data in multiple cells. The result spans to the number of cells depending upon the required data split. Specifically, how many of the separator characters are used in the formula.
In some cases, the delimiter which you use may not be a comma but rather a mix of say comma along with spaces. In such an instance, it is possible to establish Split Text to Columns more than once, first splitting the cell based on said comma and then using either spaces or tabs for the second step.
Conclusion
Now that we have covered how to split cells in Google Sheets, you will see that the formula method of splitting cells is more dynamic than the menu option method. You will need to remember not to have a blank space after your comma in the formula. Also, make sure whoever inputs the data does not add commas into the cell description. Split cells how you would like, depending on your preferences and methods.
A brief Introduction About EasyInsights
As a marketer, you rely on accurate and timely data to optimize performance. But pulling data manually from multiple platforms, transforming it, and keeping it ready for analysis is not just tedious – it’s also error-prone and consumes valuable time that could be spent on driving growth.
EasyInsights empowers brands with:
- First-Party Data Activation – Seamlessly activate your customer data across ad platforms to improve targeting, personalization, and ROAS.
- Data Tracking – Ensure every click, conversion, and interaction is captured reliably, across devices and channels.
- Attribution – Go beyond siloed platform tracking and get a clear, unbiased view of what’s actually driving results across all touchpoints.
- Track the entire customer journey from first click to lifetime value
- Cross-platform user behavior: Connect interactions across domains and device
- Accurate attribution models: Attribute revenue to the right channels with confidence
- Repeat purchases: Understand customer retention and repurchase behavior
- Subscription renewals: Track recurring revenue events across platforms
- Upsells and cross-sells: Identify high-value actions beyond the initial conversion
- Improved campaign optimization: Feed complete data back into ad platforms for better automated bidding
With EasyInsights, you don’t just move data – you make it actionable. By connecting data pipelines, enriching customer journeys, and enabling precise attribution, EasyInsights helps marketers spend less time on manual work and more time on strategy.
You can connect all your data sources to EasyInsights
Benefits Of Using EasyInsights
- Completely automated: The EasyInsights platform is simple to set up and requires little maintenance.
- Real-time Data Transfer: EasyInsights offers real-time data migration so that you always have analysis-ready data.
- 100% Complete & Accurate Data Transfer: EasyInsight’s robust infrastructure ensures dependable data transfer with no data loss.
- Scalability: EasyInsights has built-in integrations from all the popular marketing data sources, allowing you to scale your data infrastructure as needed.
Book a Demo! today with EasyInsights
Bonus Read: Unlock First-Party Data for Audience Activation and Data Enrichment
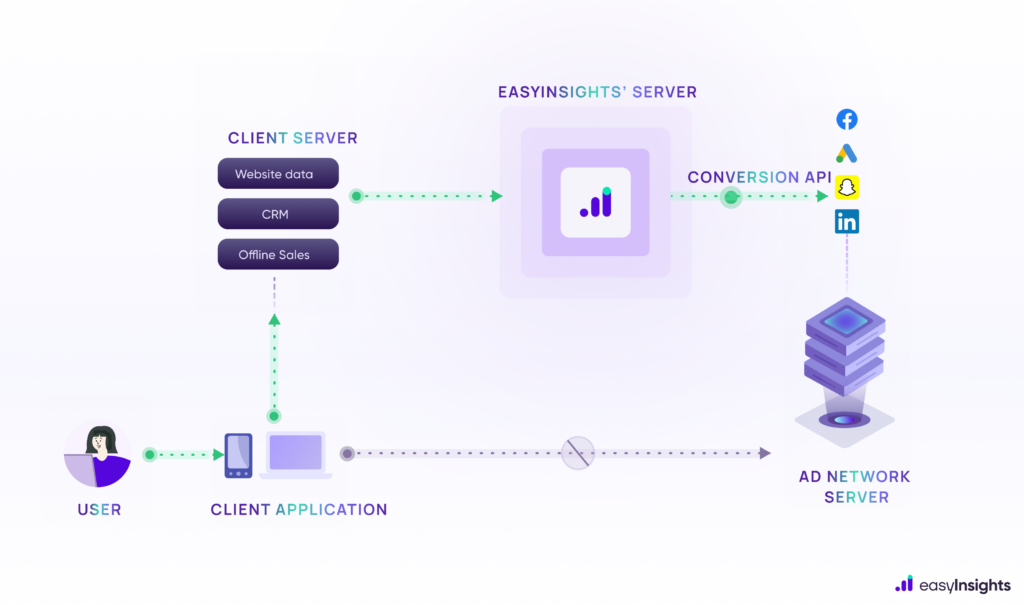
EasyInsights works with data from various platforms for data activation and data enrichment in a few key ways:
Data Collection and Transformation:
- EasyInsights connect directly to your CRMs, ad platforms, analytic platforms, CEPs and other tools allowing it to access and extract the raw data you’ve collected.
- Data Transformation: EasyInsights then cleans, normalizes, and enriches the data to make it usable for activation purposes. This may involve tasks like:
- Formatting data: Ensuring all data points are in a consistent format.
- Handling missing values: Filling in missing data points or removing them according to your preferences.
- Enriching data: Adding additional data points from other sources to create a more comprehensive picture of your customers.
Additional Reading : Composable CPDs : Some Common Misconceptions
Data Activation:
- Segmentation and Targeting: It allows you to segment your audience based on various criteria like demographics, behavior, and interests using the enriched first-party data.
- Multi-channel Marketing: You can then use these segments to activate your audience across different marketing channels like email, social media, and advertising platforms.
- Customer Relationship Management (CRM): The data can be used to personalize outreach and interactions with customers within your CRM system.
- Marketing Attribution: EasyInsights can help you understand how different marketing channels contribute to conversions and optimize your marketing spend accordingly.
Key Feature:
- Offers features like customer data platform (CDP) capabilities, marketing automation, and campaign management tools.
- Focuses on reverse ETL (extracting data from your warehouse and sending it to marketing tools) and offers pre-built integrations with various marketing platforms.
EasyInsights is a marketer’s preferred tool for first party data activation.
In this age of cross-channel marketing, EasyInsights offers a comprehensive platform to collect, store, and transform all your first-party data.
EasyInsights enhances marketing campaign efficiency in a cookieless landscape with accurate ad signals. It helps brands step away from surface-level metrics and unleash the potential of first-party data to optimize marketing strategies, ensuring a superior Return on Ad Spend (ROAS). It does all this, while being a highly affordable no-code platform with an exceptional customer support apparatus.
Sign up for a demo today to see EasyInsights in action.